- 版本:1.2.4
- GitHub:
- NPM: https://npmjs.net.cn/package/%40badideas%2Fnativescript-push
- 下载次数
- 昨天: 0
- 上周: 0
- 上个月: 0
[npm-image]:http://img.shields.io/npm/v/@badideas/nativescript-push.svg [npm-url]:https://npmjs.net.cn/package/@badideas/nativescript-push [downloads-image]:http://img.shields.io/npm/dm/@badideas/nativescript-push.svg
此插件是 nativescript-community/push 的分支,后者是从 nativescript-plugin-firebase 的消息部分“提取”出来的。它仅适用于尽可能少使用 Firebase 的人!iOS 上没有 Firebase!!
感谢 Eddy 允许这样做!
Android
在 Google 控制台中打开您的 Firebase 项目,然后单击“添加应用”以添加 Android 应用。按照步骤进行(确保包标识符与 package.json 中的 nativescript.id 相同,然后您将能够下载 google-services.json,并将其添加到您的 NativeScript 项目中的 app/App_Resources/Android/google-services.json)
有一个小问题:如果您在应用处于后台时收到通知,则将无法获得标题和正文,但您将获得 数据 负载。
iOS
在 Xcode 中启用推送支持
打开 /platforms/ios/yourproject.xcworkspace (!) 并转到项目目标,然后转到“功能”以启用它(如果尚未启用)

如果没有启用此功能,您将在前台接收推送消息,但 无法在后台 / 应用被杀死时接收。
复制权限文件
上一步创建的文件是 platforms/ios/YourAppName/(Resources/)YourAppName.entitlements。将其复制到 app/App_Resources/iOS/app.entitlements(如果尚不存在,则合并其内容),这样在您删除和重新添加 iOS 平台时它不会被删除。该文件中与后台推送相关的相关内容是
	<key>aps-environment</key>
	<string>development</string>
注意文件名应为
app.entitlements,请参阅上面的路径。
在 Info.plist 中配置推送通知
告诉插件允许外部推送提供者,请将以下内容添加到 App_Resources/iOS/Info.plist(如果没有此设置,推送令牌将始终为 undefined!)
<key>UseExternalPushProvider</key>
<true/>
并且为了允许在收到后台推送时进行处理,也添加以下内容
<key>UIBackgroundModes</key>
<array>
  <string>remote-notification</string>
</array>
最终结果应如下所示 此。
API
init
在您的主应用程序 JS 文件中,您必须调用 init()。
import * as messaging from '@badideas/nativescript-push';
messaging.init();
areNotificationsEnabled
在 iOS 和 Android 上,用户可以禁用对您的应用的推送通知。如果您想检查此设置的当前状态,您可以这样做
import * as messaging from "@badideas/nativescript-push";

console.log(`Notifications enabled? ${messaging.areNotificationsEnabled()}`);
registerForPushNotifications
注册(接收)推送通知的最简单方法是调用 registerForPushNotifications,并传递一些处理程序
import * as messaging from "@badideas/nativescript-push";

messaging.registerForPushNotifications({
  onPushTokenReceivedCallback: (token: string): void => {
    console.log("Firebase plugin received a push token: " + token);
  },

  onMessageReceivedCallback: (message: messaging.Message) => {
    console.log("Push message received:", message));
  },

  // Whether you want this plugin to automatically display the notifications or just notify the callback. Currently used on iOS only. Default true.
  showNotifications: true,

  // Whether you want this plugin to always handle the notifications when the app is in foreground. Currently used on iOS only. Default false.
  showNotificationsWhenInForeground: true
}).then(() => console.log("Registered for push"));
任何挂起的通知(当您的应用不在前台时)将触发
onMessageReceivedCallback处理程序。
在
onPushTokenReceivedCallback中接收到的token允许您向此设备发送通知。
getCurrentPushToken
如果您出于某种原因需要手动检索设备的当前推送注册令牌,您可以这样做
import * as messaging from "@badideas/nativescript-push";

messaging.getCurrentPushToken()
    .then(token => console.log(`Current push token: ${token}`));
交互式通知(目前仅限iOS使用)
要将应用程序注册为接收交互式推送,您需要调用 messaging.registerForInteractivePush(model)。您还可以连接到 model.onNotificationActionTakenCallback 回调,以了解用户与通知交互时执行了哪些操作。
每个动作都有 button 或 input 类型,您可以设置 options 以执行以下任意或所有操作:
- 启动应用程序:
foreground。 - 仅当设备解锁时允许操作:
authenticationRequired。 - 使文本变红以表示将删除/删除/终止某些内容:
destructive。
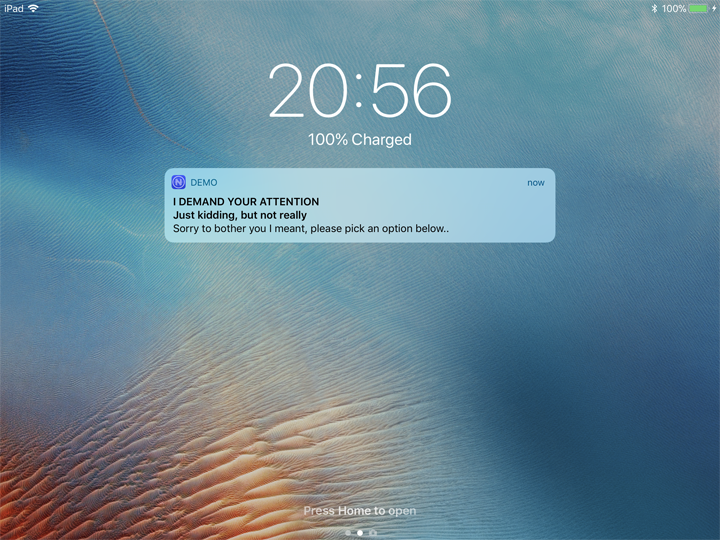
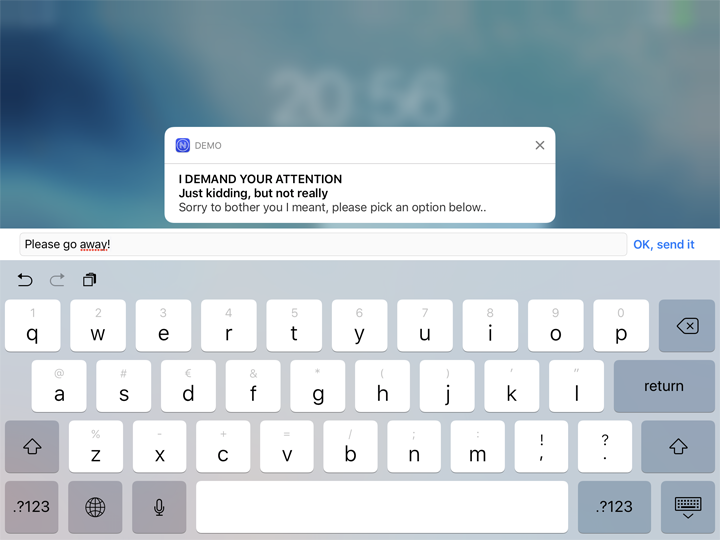
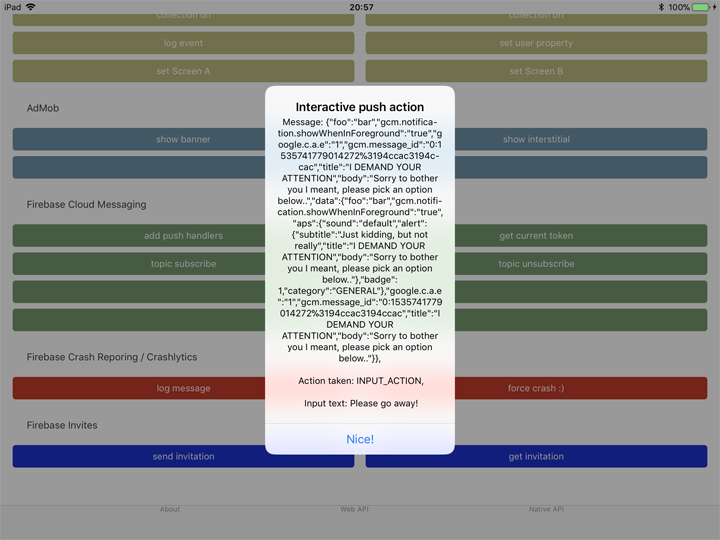
考虑以下示例,用户接收了一个交互式推送通知并将其展开,选择了第四个选项。然后他们键入回复,并且(由于操作配置的原因)应用程序启动并捕获了回复。

import * as messaging from "@badideas/nativescript-push";

const model = new messaging.PushNotificationModel();
model.iosSettings = new messaging.IosPushSettings();
model.iosSettings.badge = false;
model.iosSettings.alert = true;

model.iosSettings.interactiveSettings = new messaging.IosInteractivePushSettings();
model.iosSettings.interactiveSettings.actions = [
  {
    identifier: "OPEN_ACTION",
    title: "Open the app (if closed)",
    options: messaging.IosInteractiveNotificationActionOptions.foreground
  },
  {
    identifier: "AUTH",
    title: "Open the app, but only if device is not locked with a passcode",
    options: messaging.IosInteractiveNotificationActionOptions.foreground | messaging.IosInteractiveNotificationActionOptions.authenticationRequired
  },
  {
    identifier: "INPUT_ACTION",
    title: "Tap to reply without opening the app",
    type: "input",
    submitLabel: "Fire!",
    placeholder: "Load the gun..."
  },
  {
    identifier: "INPUT_ACTION",
    title: "Tap to reply and open the app",
    options: messaging.IosInteractiveNotificationActionOptions.foreground,
    type: "input",
    submitLabel: "OK, send it",
    placeholder: "Type here, baby!"
  },
  {
    identifier: "DELETE_ACTION",
    title: "Delete without opening the app",
    options: messaging.IosInteractiveNotificationActionOptions.destructive
  }
];

model.iosSettings.interactiveSettings.categories = [{
  identifier: "GENERAL"
}];

model.onNotificationActionTakenCallback = (actionIdentifier: string, message: messaging.Message) => {
  console.log(`onNotificationActionTakenCallback fired! Message: ${JSON.stringify(message)}, Action taken: ${actionIdentifier}`);
};

messaging.registerForInteractivePush(model);
要发送交互式推送,将通知的 "category" 属性添加到通知中,其值对应于在应用程序中注册的模型中定义的 category。触发上述截图中通知的负载是
{
  "aps": {
    "alert": {
      "title": "Realtime Custom Push Notifications",
      "subtitle": "Now with iOS 10 support!",
      "body": "Add multimedia content to your notifications"
    },
    "sound": "default",
    "badge": 1,
    "category": "GENERAL",
    "showWhenInForeground": true,
    "data": {
      "foo": "bar"
    }
  }
}
重要 只在iOS的推送通知中使用
click_action。当在Android通知中心轻触此类消息时,应用程序不会打开。这可能会在未来得到修复。
推送通知测试
iOS
对于在iOS上测试通知,我发现最简单的工具是Pusher

Android
对于Android上的测试,我更喜欢使用Postman 来 POST 到 FCM REST API。查看您需要设置哪些标题,以及如何添加负载

