- 版本: 1.0.1
- GitHub: https://github.com/NativeScript/plugins
- NPM: https://npmjs.net.cn/package/%40nstudio%2Ffilterable-listpicker
- 下载量
- 昨日: 0
- 上周: 2
- 上月: 9
nativescript-filterable-listpicker
iOS 和 Android 上的原生列表选择器并不适用于用户可能想要过滤的大型列表。此插件是一个提供过滤功能的模态框。

安装
tns plugin add nativescript-filterable-listpicker用法
为了使用此插件,您必须在页面中放置它,并指定一个命名空间。无论您将其放置在哪里,调用它时都会在那里显示,但它在调用之前会隐藏。使用此插件的最佳方法是将它放置在页面内容上方,如下所示
NativeScript 核心库
<Page xmlns="http://schemas.nativescript.org/tns.xsd" loaded="pageLoaded" class="page" xmlns:ui="nativescript-filterable-listpicker">
    <GridLayout rows="" columns="">
        <Image src="https://i.pinimg.com/736x/a4/40/04/a4400453bad6d581ec203ad1455d0c8f--pretty-pics-pretty-pictures.jpg" stretch="aspectFill" />
        <GridLayout rows="*, auto, *">
            <StackLayout height="300">
                <Button text="Pick Your Fav Language" tap="{{showPicker}}" height="50" width="250" style="background-color: rgba(0,0,0,0.7); color: white; border-radius: 25; margin-bottom: 20;margin-bottom:15"/>
                <Button text="Pick Your Favorite Animal" tap="{{showNewThings}}" height="50" width="250" style="background-color: rgba(0,0,0,0.7); color: white; border-radius: 25;margin-bottom:15"/>
                <Button text="Use it like Autocomplete" tap="{{showPickerAsAutocomplete}}" height="50" width="250" style="background-color: rgba(0,0,0,0.7); color: white; border-radius: 25;"/>

                <Label text="{{selection ? 'I chose ' + selection : ''}}" textWrap="true" style="font-size: 30; text-align: center; margin-top: 50; font-weight: bold; color: white;" />
            </StackLayout>
        </GridLayout>
        <!-- props to tes: enableSearch="false" showCancel="false" headingTitle="Testing" -->
        <ui:FilterableListpicker focusOnShow="false" id="myfilter" blur="dark" dimmerColor="rgba(76,196,211,0.7)"  hintText="Type to filter..." source="{{listitems}}" canceled="{{cancelFilterableList}}" itemTapped="{{itemTapped}}" />
    </GridLayout>
</Page>
然后在您的代码中...
public showPicker() {
    page.getViewById('myfilter').show();
}

public itemTapped(args) {
    alert(args.selectedItem + ' was tapped!')
}

public cancelFilterableList() {
    // this gets called if the user cancels the modal.
}
用作自动完成
您可以使用 nativescript-filterable-list-picker 作为来自后端服务器或第三方提供商(如 Google Place API)的自动完成功能。请参阅示例。如果在使用 autocomplete 函数之前绑定源,则这些资源将被克隆,并且直到 TextField 为空,可过滤列表选择器将填充这些资源,如果您开始输入,则自动完成将接手。
let API_KEY = "__YOUR_GOOGLE_API_KEY";

private filterableListpicker: FilterableListpicker;
private page: Page;
constructor(page: Page) {
    super();
    this.page = page;
    // Get filterableListpicker instance
    this.filterableListpicker = (<any>this.page.getViewById('myfilter'));
    MyModel = this;
}

public showPickerAsAutocomplete() {
    // IMPORTANT : Set `isAutocomplete` to true to enable `textChange` listener
    this.filterableListpicker.isAutocomplete = true;
    this.filterableListpicker.show(frame.topmost());

    this.filterableListpicker.autocomplete((data) => {
        let url = placesApiUrl + "?input=" + data.value + "&language=fr_FR&key=" + API_KEY;
        http.getJSON<Predictions>(url).then((res) => {
            //console.dir(res)
            const airportsCollection = res.predictions;
            const items = [];
            for (let i = 0; i < airportsCollection.length; i++) {
                items.push({
                    title: airportsCollection[i].description,
                    description: "",
                    source: airportsCollection[i]
                });

            }
            this.set("listitems", items)
        }).catch((err) => {
            const message = 'Error fetching remote data from ' + url + ': ' + err.message;
            console.log(message);
            alert(message);
        });
    });
}
NativeScript Angular
在 Angular 中,您必须在您的应用程序组件中注册元素,如下所示
// app.component.ts
import {registerElement} from "nativescript-angular/element-registry";
registerElement("FilterableListpicker", () => require("nativescript-filterable-listpicker").FilterableListpicker);
然后在您的模板中使用...
<GridLayout>
    <Image src="res://nicebackgroundimage.jpg"></Image>
    <StackLayout>
        <Label text="Whats your favorite programming language?"></Label>
        <Button text="Choose a Language" (tap)="showPicker()"></Button>
    </StackLayout>
    <FilterableListpicker #myfilter blur="dark" hintText="Type to filter..." [source]="listitems" (canceled)="cancelFilterableList($event)" (itemTapped)="itemTapped($event)"></FilterableListpicker>
</GridLayout>
然后在您的代码中...
@ViewChild('myfilter') myfilter: ElementRef;

cancelFilterableList() {
    console.log('canceled');
}

itemTapped(args) {
    alert(args.selectedItem)
}

showPicker() {
    this.myfilter.nativeElement.show();
}
注意:从 2.1.0 版本开始,调用 show 时,您可以传递一个视图容器,插件将使用该容器查找必要的元素。这允许您现在在模态框中使用列表选择器!例如,您可以传递一个页面元素,或者包含 FilterableListpicker 元素的网格布局,如下所示
在 android 中
@ViewChild('myContainer') myContainer: ElementRef;

public function showPicker() {
  this.myfilter.nativeElement.show(this.myContainer.nativeElement);
}
注意:您可以通过在您的 observable 中将源设置为数组并更改该数组来轻松地更改可过滤列表中的项目。请参阅示例项目以获取示例。
源数组
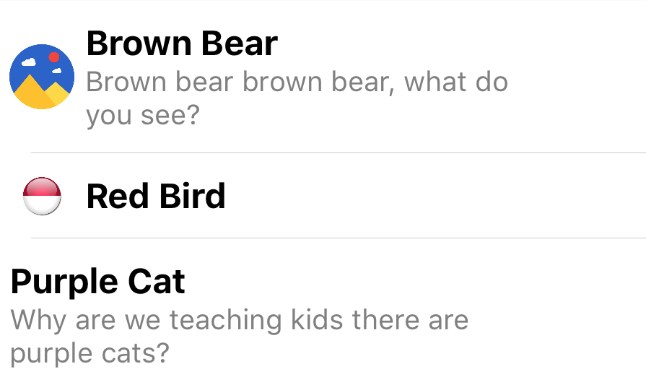
从版本 2.0 开始,您可以提供字符串数组或对象数组。对象必须包含一个名为 title 的参数,它将用作标题并显示为粗体。查看上面的 gif 图,以了解提供对象时选择器的样子。选择器将显示以下 3 个参数
| 属性 | 描述 |
|---|---|
| title | 标题,这是您的列表将过滤的内容,它将显示为粗体。 |
| image | 可选:这将显示在标题的左侧。 |
| description | 可选:这将显示在标题下方,较小并呈灰色。 |
以下是一些示例代码
public listitems = [
    {
        "image": "https://lh3.googleusercontent.com/gN6iBKP1b2GTXZZoCxhyXiYIAh8QJ_8xzlhEK6csyDadA4GdkEdIEy9Bc8s5jozt1g=w300",
        "title": "Brown Bear",
        "description": "Brown bear brown bear, what do you see?"
    },
    {
        "image": "http://icons.veryicon.com/png/Flag/Rounded%20World%20Flags/Indonesia%20Flag.png",
        "title": "Red Bird"
    },
    {
        "title": "Purple Cat",
        "description": "Why are we teaching kids there are purple cats?"
    }
];
例如,您可以处理 API 调用的结果并使用对象结果数组的数组来显示在选择器中。数组中的对象可以包含其他参数(如 ID 等),选择器将使用 title、image 和 description(如果存在)。尽管 title 必须存在。
以下是它在选择器中的样子

Webpack
感谢 Mike Richards,此插件现在与webpack兼容。请仔细遵循webpack说明,特别是 bundle-config.js 和 require("bundle-entry-points"); 部分。更多信息 请在此处查看。
API
UI元素接受以下参数
| 属性 | 默认值 | 描述 |
|---|---|---|
| source | 必需 | 您想要在选择器中显示的字符串或对象数组(见上方“源数组”)。 |
| hintText | 输入过滤文本... | 这是显示在用于过滤列表的文本框上的提示文本。 |
| listWidth | 300 | 模态元素的宽度。 |
| listHeight | 300 | 模态元素的高度。 |
| focusOnShow | false | true 或 false,表示文本框是否应该在显示列表时处于焦点(并且键盘打开)。 |
| dimmerColor | rgba(0,0,0,0.8) | 模态后面的暗色区域的颜色。您可以将其设置为 透明,或任何NativeScript支持的颜色(例如:rgba(255,255,255,0.5),red,#0088CC)。 |
| blur | none | 仅iOS。传递 dark 或 light 以实现暗色或亮色模糊效果。如果传递了此参数,iOS上的dimmerColor将被忽略,但在Android上将被尊重。 |
| itemTapped(args) | 当列表中的项被点击时调用此函数。模态将自动消失,您可以通过 args.selectedItem 访问被点击的项。 |
|
| canceled | 这是一个在用户取消时调用的函数,可能很少需要。 | |
| showCancel | 显示取消按钮或不显示。 | |
| enableSearch | 允许通过在顶部显示TextField进行搜索。 | |
| autocomplete(fn: Function) | 允许将监听器 textChangeEvent 绑定到Textfield,并将插件用作 autocomplete,例如:Google Place API。 |
CSS样式
.flp-container .flp-list-container {
  border-radius: 10;
}
.flp-container .flp-list-container .flp-listview {
  background-color: white;
}

.flp-container .flp-list-container .flp-listview .flp-row {
  background-color: white;
}
/* .flp-container .flp-list-container .flp-listview .flp-row .flp-row-container {
  padding: 10;
} */
.flp-container .flp-list-container .flp-listview .flp-row .flp-image {
  margin: 10 0 10 5;
}
.flp-container .flp-list-container .flp-listview .flp-row .flp-title-container {
  margin: 10 10 10 5;
  /* margin: 0 10 0 10; */
}
.flp-container .flp-list-container .flp-listview .flp-row .flp-title-container .flp-title {
  font-weight: bold;
  font-size: 16;
}
.flp-container .flp-list-container .flp-listview .flp-row .flp-title-container .flp-description {
  color: gray;
  font-size: 13;
}
.flp-container .flp-list-container .flp-listview .flp-row .flp-title-container .flp-no-title {
  margin-left: 15;
  padding: 10 0;
}
.flp-container .flp-list-container .flp-listview .flp-row .flp-item-selected {
  color: lightblue;
}

.flp-container .flp-hint-field {
  padding: 10 15;
  height: 40;
  background-color: #E0E0E0;
  border-radius: 10 10 0 0;
}

.flp-container .flp-cancel-container {
  background-color: #E0E0E0;
  height: 40;
  border-radius: 0 0 10 10;
}

.flp-container .flp-cancel-container .flp-btn-cancel {
  font-weight: bold;
  height: 40;
  background-color: transparent;
  border-color: transparent;
  border-width: 1;
  font-size: 12;
}
许可协议
Apache License Version 2.0, January 2004
